TLDR; - Skip straight to the Instructions
My love for Mavericks#
I have a soft spot for Mavericks. It was one of the first versions of MacOS I used on a daily basis. It was around 2013 when I purchased my first Mac, a MacBook Air 13", which was impossibly thin at the time compared to everything else in the market.
Being an early adopter, I also quickly upgraded to the flat design of Yosemite. I remember it never felt the same, but there often is no going back with security updates and improvements that lock you in with new features like Airdrop..
It’s a shame I didn’t get to spend more time with the operating systems named after big cats, instead with the operating systems based in beautiful places in California.
The crack product marketing team in their Volkswagen minibus
It was also the last OS before Apple introduced transparency in all their windows, as well as dark mode.
There was also the promise for an additional 2 hours of potential battery life for free
Diving into Aqua and the UI elements of MacOS is a topic better left to be argued by designers. See short blog post from Louie Mantia (a prominent designer who made quite a few icons you’d recognise) about the shift in Apple design and the shift to minimalism.
Tangent Some of the original UI components and apps are based on NextStep, which influenced Cocoa which is what Mavericks is based on. If you want to try an alternative implementation of the UI elements, see GNUstep which is remarkably similar. If you’re looking into the design, you may as well read this 99pi article about Susan Kare, a designer with very recognisable pixel art..
There’s also great article from ArsTechnica that highlights a lot of history of MacOS changes. If you’re going down the rabbit hole of Apple Design, it’s worth also looking at their design motifs End Tangent
I won’t go in depth about the evolution of Apple design, but i’ll leave you with this imagery where I think Liquid Glass fits.
Anyway, that’s enough of an intro.
Instructions#
It’s Marchintosh, and what better way to spend it on your Apple Silicon device, than to run an operating system your device doesn’t natively support! This guide assumes you’re running UTM, either from Github or the App store, on an Apple Silicon M1+ device.
Step 1 - obtain installation medium#
Mavericks was the first MacOS to download from the App Store, (which was also free). Apple mysteriously doesn’t link to 10.9 on their download pages, and the method that doesn’t make you go hunting on the internet archive, is to obtaining an iso using the tools on MavericksForever
You can do this in a simple command. I’d recommend inspecting the bash file before executing, as it may change between now and when you’re reading this. This will download an image as .dmg, where you’ll then convert to an .iso
curl mavericksforever.com/get.sh | sh
Then utilise your inbuilt disk tools to convert the downloaded dmg to iso.
hdiutil convert InstallMacOSXMavericks.dmg -format UDTO -o mav.iso
Rename the file to an iso
mv mav.iso.cdr mav.iso
Now we’ve got the install disk, it’s time to download the UTM config. This has a few images prepped that enable easy installation of MacOS.
A technical note about the config. It’s based on Tianocore, with OVMF, adding UEFI to VMs. The image included in the utm config is about 5 years old, as troubleshooting getting the latest version running is out of scope, when this one just worked. You can try building from source and letting me know in the comments below how it goes! Open core images are from khronokernel. I’d recommend following their guide
Step 2 - load vm and first install#
Load the Iso into UTM, then start it up and install.

This is going to take a while.. the above gif is sped up to illustrate what you’d expect to see. due to the terms, you’ll have to download the iso yourself


If you’re going to connect to the internet, you may run into the same issue I had. Changing the DNS to 1.1.1.1 or your flavour of choice allowed internet access with no issues… well sort of.
Step 3 - Optional#
The next step is optional, but recommended if you’re going to use this. Updating the OS to at least patch it with a 2016 security patch from Apple is a good start, but going through the optional additional items are a good way
Exploring#

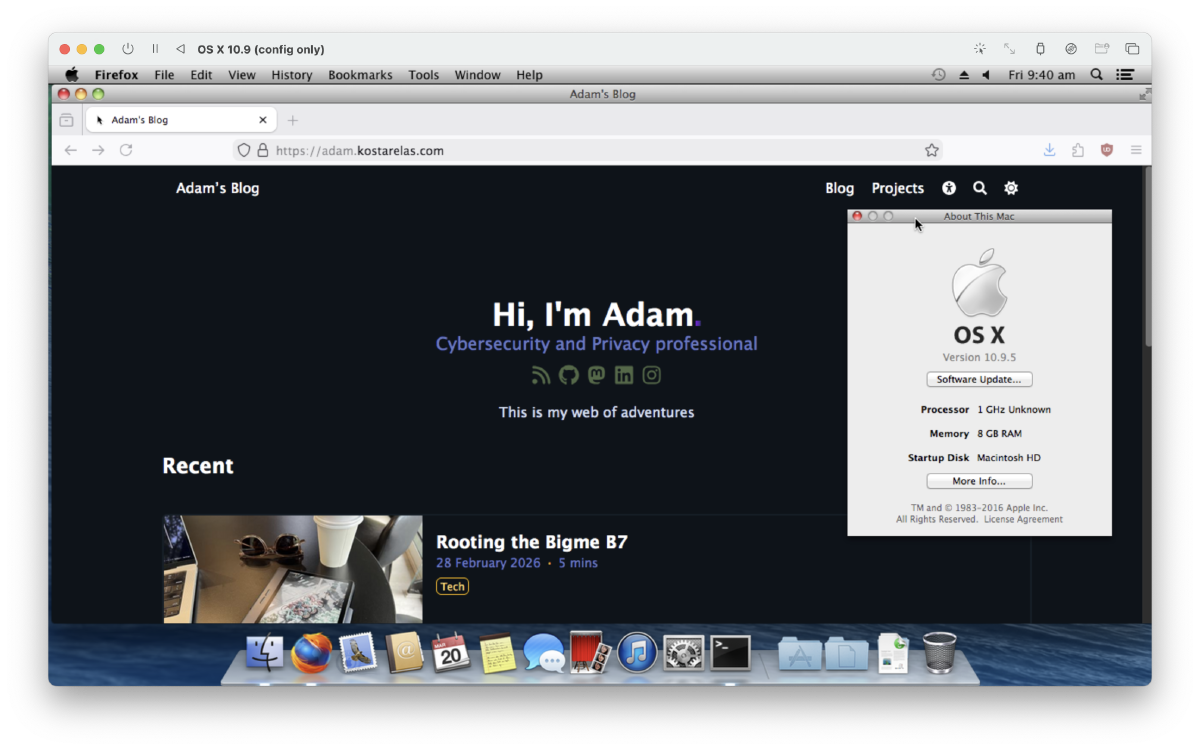
I feel rather nostalgic with the original Safari design. It may be worth theming Firefox to bring it back..?
Talking about Safari, there were other features inbuilt, long forgotten since Mavericks.
Trying to browse to my blog is rather unsuccessful.

I would look at the firefox forked browser as an option to tinker with, as well as to install a few of the optional extras to make the experience a bit more friendly.

The UTM template has 8GB of RAM, which is more than the 2.9GB or so being used when idle.

Trying anything that requires GPU is a bad idea. Chess, Launchpad and videos were essentially slideshows and not pleasant. Unfortunately I couldn’t figure out a way to pass more resources as UTM didn’t support the additional parameter (for now).


Want to try an alternate version of MacOS?#
Check out @adespoton on Github for a list of configs to get you going.
I’d recommend downloading the installer directly from Apple, using a tool like Mist
Make sure to select the Application type or Disk Image.
If you select Application, you can use the createinstalliso tool from BITespresso on Github to create an ISO.
sudo ~/bin/createinstalliso --isodirectory <path to ISO directory> --applicationpath <path to OS installer application> [--nointeraction]
Otherwise you can follow the hdiutil command from above to convert it to a disk image and rename to ISO. This isn’t best practise, however does get the job done.
Things to do#
Due to the graphical limitations, there isn’t a whole heap that’s possible. Yes, it’s a novelty to jump into any non demanding tasks and do some basic web browsing, but that’s about it. Emulating the penryn processor is impressive enough, and maybe one day there will be better support for emulating older operating systems.. Or who knows, maybe Apple will bring back the plateau dock, giving us a taste of skeumorphism again? Don’t get me wrong, MacOS has improved in stability, performance and quality of life, but it is fun to revisit what once was and tinker around.
It might be fun to restore from a time machine backup on the network to have a literal timecapsule. I know i’ve got a couple licenses for software I can play around with.
Let me know how you go, and reach out on Github if you run into any issues. I’ll update this post with any optimisations I find along the way.
Most underrated photo editing app - Aperture#
Sort of makes a comeback, if you’re patiend and want to play workarounds. This would be so much simpler on a physical device though